
Silent Sunday
Food and travel
If you have a baby or toddler there seems to be a few questions which get asked repeatedly by everyone you see, they also get debated on social media or snidely mentioned at playgroups:
1. Does he/she sleep through the night?
This is one which I got asked by pretty much every person I spoke to for the first 12 months of Izzys life. Sometimes by people without children who were curious, sometimes by my family depending on how knackered I looked but mostly by people who already had children ..perfect children who could put themselves to sleep and sleep 7-7 from an absurdly young age.. They asked me so that in turn I would ask them and then they could do the smug smile and tell me what I really did not want to hear.
Izzy is 14 months old. She has just started sleeping through the night and it’s still not a certainty. Most nights we climb into bed hoping and hoping for an uninterrupted night and luckily now.. Finally I’d say maybe 4 out of 7 nights we get it. Yay. I won’t gloat over that as I know it could change in a minute.

Sleeping ..like a baby. Hahahahahaha hahahaha.
2. Is he/she walking?
This is something I have noticed discussed more and more at playgroups and more often that not it seems to be a very competitive subject amongst the parents. Why? It’s your child learning to walk not you. If they do it at 8 months or 18 months it doesn’t make you a better parent, yes be proud of your child but please don’t tell someone whose baby is just 16 months old that perhaps they should get them checked out because they aren’t yet walking. This happened at my local playgroup last week and the poor mum looked so upset.
Izzy took her first steps at 9 months, it was exciting and I think mainly happened as she is so damn nosey. She very quickly realised that she could get about crawling a lot faster and with less bumps so she gave up on it for a while before getting back into it around 11/12 months. Now she is too fast for my liking and can climb onto tables in the blink of an eye. This is scary so please enjoy your crawling baby a little longer. They only walk when THEY are ready.

3. What can he/she say?
From reading some of the more popular baby forums you would think that all babies are putting together full sentences by the time they are one and can sign for everything they want or need. Is this really the case? Are there some super babies?
Izzy babbles A LOT but it’s mostly mam, dad, nanna or variations of and her very favourite word/sound Hiya. She doesn’t really say a lot more than that. She has learnt to say ta or mmmmm when she wants something be it food or drink and will occasionally say other words such as car, family names or a noise which sound like she is clearing her throat instead of tick tock (clock).
I don’t expect a lot more at this age and I don’t get frustrated as I know she is taking in so much. I do occasionally get a bit embarrassed by the Hiyas though. Anyone else have a baby who will not stop saying hiya.. Over and over again. Normally in quiet restaurants.
I haven’t taught Izzy any sign language and I know it’s a very popular method these days, she has learnt to point at what she likes, puts her arms up to be held or her best one of all ..going stiff and throwing her head back. I believe the last one is pretty common and pretty much just means she is peed off.
There are many more of these questions but they seem to be the most popular ones.
What can your child do? Do you feel under pressure by family/playgroupers/forumfriends/tweeters?
I’d love to know.
I’ve tried not to gloat too much about my amazing child but seriously how many of your children will do this when asked to do a trout pout?

It’s her party piece 😉
Earlier this year myself and Izzy won an amazing prize from Plum baby to attend a cookery course run by the very lovely Beverly Glock and one of my favourite chefs Rachel Allen.

It was fantastic and I met some lovely mums including obviously Rachel Allen who is not only a great chef but a genuinely nice lady (and fellow mum) who has very very kindly agreed to share a recipe with us so I’ll stop waffling and leave you to read why Rachel likes this recipe:
Maple Pecan cake – perfect for Thanksgiving
I absolutely adore Maple Syrup, one taste of it always brings me right back to when I was younger and used to visit my grandparents in Canada. Maple syrup and pecans are a classic combination and work particularly well together in this delicious cake… I hope you enjoy:
Ingredients
200g (7oz) self raising flour
1/4 tsp salt
200g (7oz) soft light brown sugar
125ml (4&1/2fl oz) buttermilk
200g (7oz) butter, melted plus extra for greasing
50ml (2fl oz) maple syrup
2 eggs, beaten
75g (3oz) pecans, finely chopped
For the praline:
50g (2oz) caster sugar
50g (2oz) pecans
For the icing:
300g (11oz) cream cheese
25ml (1fl oz) maple syrup
200g ( 7oz) icing sugar, sifted
Method:
Preheat the oven to 180°C (350°F/ Gas 4), then butter the sides of the cake tins ( 2 x 18inch) and line the base of each tin with a disc of baking parchment. Sift the flour and salt into a large bowl and mix in the sugar.
In a separate bowl, whisk the buttermilk with the butter, maple syrup and eggs. Add the wet ingredients to the flour and sugar, mixing together to combine, then fold in the chopped pecans.
Divide the batter between the prepared tins and bake for 20–25 minutes or until golden on top and springy to the touch.
Remove from the oven and allow to cool in the tin for 10 minutes. Loosen around the edges using a small, sharp knife and carefully remove each cake from its tin before transferring to a wire rack to finish cooling down.
Meanwhile, make the pecan praline. First line a baking tray with a sheet of baking parchment, then place the sugar in a non-stick frying pan or saucepan and scatter the nuts over the top. Cook over a medium heat until the sugar turns a caramel colour.
Do not stir the pan, but carefully ‘swirl’ it to allow the sugar to caramelise evenly and to coat the nuts in caramel. Alternatively, you could just toast the pecans instead.
For the icing: Whisk together all the ingredients until smooth. Place one cake upside down on a plate and spread over some of the icing, so that it’s about 5mm thick.
Place the other sponge on top, right side up, then cover the whole cake with the icing, using a palette knife dipped in hot water to smooth the surface. Decorate with the caramelised or toasted pecans to finish.

Thanks to Rachel for the above recipe which can be found in her new book called Cake, I bought mine from Amazon
You can also watch her new tv show Cake diaries on the Good Food channel, although its worth having a slice of cake to watch it with as you will get hungry!
For all you tweeters you can find Rachel on @rachelallen1 she’s very involved and seems to reply to every tweet she can so any baking questions you have it’s worth asking. She’s also pretty damn good at wordswithfriends 🙂
I will be trying this recipe out next week so I’ll let you know if mine turns out as well 😉
Every time I make Spaghetti Bolognese I make too much sauce, sometimes it’s unintentional but mostly not as I do plan to freeze it etc etc. The only problem is that my plan goes awry most of the time and I end up wasting more than I use as I forget it dwindling away in the freezer or worse I forget to freeze it at all. I have now started to use up my leftover sauce a day or two after I make it but rather than have another Spag Bol I make a tasty bolognese bake. I got the idea for this from Izzys grandfather who makes something similar but I’ve created my own somewhere along the line.
I’m sure you all have a favourite Bolognese recipe but here is mine which I have made with some additions or substitutions for years now:
Beckys Bolognese
Minced beef- of a decent quality is best as you can taste the difference
1 onion – diced
Passata
Tomato purée
3 or 4 garlic cloves minced or diced
Fresh chopped tomatoes ( I like cherry tomatoes on the vine )
Aunt Bessie’s finely chopped frozen veg
Olive oil
Fresh herbs ( think oregano, basil, rosemary, sage, thyme ) chopped. Dried is fine but fresh makes it special.
Seasoning ( seasalt and freshly ground black pepper)
Sauté your onions in the olive oil before adding your mince until browned then I literally add everything and cook for as long as I want.. The longer the better. I use the frozen mixed veg purely out of laziness but it really is great as it includes carrots, celery, onion and leeks which are all things I like in my sauce anyway. I haven’t included quantities as I never measure when making this which is probably why I always make too much!

If I have them I also like to throw in some sliced red and green peppers.
Serve with spaghetti.
**Special tip – to give your dish something extra whiz up some breadcrumbs mixed with herbs in a food processor and lightly toast in a pan with some olive oil and crushed garlic. When you have dished out sprinkle some breadcrumbs and parmesan over your dish. So good.**
And so onto my bolognese bake:
A day or two after I make my bolognese I use the leftover sauce to make a special pasta bake.
You will need:
A bag of pasta ( I tend to use penne for this)
50g plain flour
50g Butter
1 pint of Milk
175g Cheese
1/2-1tsp Mustard
Leftover Bolognese sauce
Seasoning
Cook your pasta as per packet instructions whilst slowly reheating your bolognese in a large ovenproof pan or cazuela, during this time make up a basic white sauce. To do this create a roux with your plain flour and butter then add your milk and whisk until smooth, let your sauce boil stirring continuously and then add 100g of grated cheese, seasoning and mustard. When cooked, drain your pasta and stir into your bolognese sauce. Top with your cheese sauce and sprinkle with grated cheese and season.

Place in a hot oven for 20-25 minutes until golden and bubbling.
This tastes better than the original spaghetti bolognese. The flavours in the sauce have really come together and the cheese sauce on top is divine. It’s a cheats lasagne I guess and definitely good for those on a budget as you should have everything in your cupboard or fridge already.

I serve this with a simple salad.
I love to hear your comments and I love it even more when you have tried a recipe out for yourself 🙂
* This post is part of the #FaveFamilyRecipes Competition with BritMums and Tilda Rice. Every pack sold will provide a meal to an expectant mum in Bangladesh.


Firstly apologies, I’ve been meaning to write this post for weeks and Izzy is now 13 months old!
Anyway here it is! I had wanted to make Izzy a Hungry Caterpillar cake for her first birthday since spotting one on Pinterest when she was only 3 months old, when she was a little older her aunty & uncle bought her The Hungry Caterpillar pop up book and she LOVES it so it was definitely a go.

The cake I saw on Pinterest is here and that’s more or less what I was planning to do. I made a batch of cupcakes and then my piping bag broke and well I got really annoyed and frustrated as it was the night before her party and ended up rethinking the whole idea and what I ended up with was this:

And I actually preferred it this way in the end although as someone who is far more into the taste of food than the look of food I did find it harder than it needed to be but I enjoyed it.
Heres how I did it:
You will need :
The ingredients for one Mary Berry traybake ( recipe can be found here ) I added green colouring to my traybake to make a vibrant green flesh for my caterpillar.
500g of fondant icing sugar
Icing colour ( I bought red red and kelly green from Hobbycraft)
Basic buttercream using icing sugar and butter with vanilla extract (Nielsen Massey is best) – I used leftovers from cupcakes I was making for the party so unsure of quantity.
1 cake board or piece of cardboard covered in white paper.
Cadburys chocolate fingers
Chocolate sprinkles
Follow instructions for traybake and when cooked leave until completely cooled.
I cut out a basic caterpillar body and head from my traybake – reserve the leftover sponge in case of errors or just to munch on later.
Mix up 1/2 of your fondant icing following instructions on packet and split into two, using a cocktail stick put green colouring into one 1/2 of the icing and knead to mix the colour through making one a dark green and the other 1/2 paler. Roll out and cut into strips. Spread a little buttercream over your cut out caterpillar body and then wrap in your green icing alternating between the darker and lighter colours. Reserve any leftover icing for extra decorations such as fruit for your board.
Mix up the rest of your fondant icing and split into two, use your red colouring to make a very vibrant red icing for your caterpillar head and leave the rest white.
Spread some butter cream and wrap your caterpillar head in red icing and attach to body using more buttercream if necessary. Use cadburys fingers to make legs and antenna as well as the body for your butterfly. Use leftover icing to make fruit, leaves and a butterfly as well as to make name or message for cake. I used chocolate sprinkles to make the seeds on my strawberries and my apple stork. Use dark green icing to make eyes and a chocolate chip for the nose.
To make your cake have a little sheen brush on some lemon extract or juice with a pastry brush.
I used some leftover sponge and buttercream to make a patch of grass but I don’t think it’s necessary.

She did like the cake although looked a little shocked at first, and kept wandering over to look at it every chance she got:

All in all it was a success although far from perfect which you will notice if you look closely but I loved the fact that I made her a special first birthday cake. I’m guessing as the years go on I will have to become more elaborate!
I’ve been on the hunt for the perfect pulled pork recipe for ages and I’ve scoured the web for one that sounds just right but couldn’t find what I wanted until a twitter friend ( @babberblog ) mentioned that he had a great recipe and very kindly agreed to email it to me. Fast forward about two weeks and we were on a few days break at an apartment in a holiday park in Woolacombe and I thought that it was the ideal time to try out this recipe.. The fact that I wouldn’t be paying for the 8 hours of slow cooking in a gas oven may have swayed that decision.
I bought all the required herbs and spices locally ( well the ones I didn’t already have) and then picked up a big pork shoulder in Tescos. We didn’t know where the nearest butchers was and I was convinced that a basic pork shoulder from Tesco wouldn’t be great but it really really was.
So anyway here are the ingredients you need, I’ll show you the ingredients listI was given then how I adapted it slightly to suit me:
Babberblogs pulled pork:
A big Pork shoulder
2 tbsp American Mustard
10 tbsp Dark brown sugar
10 tbsp white sugar
6 tbsp Paprika
3 tbsp Sea salt (coarse ground)
3 tbsp Garlic granules
2 tbsp Black pepper (freshly ground)
2 tbsp Ginger powder
2 tbsp Onion powder
2 tbsp Rosemary (ground)
2 tbsp Celery seeds (coarse ground)
My slightly adapted list:
Biggest pork shoulder Tescos had, it cost me just £4 ( not on offer)
2 tbsp Colmans English Mustard ( could not find American anywhere at the time)
8 tbsp Billingtons Molasses
8 tbsp white sugar
5tbsp Paprika
1tbsp smoked Paprika
2 tbsp standard sea salt
1 tbsp Maldon smoked sea salt
3 tbsp garlic granules
1 tbsp black pepper
1 tbsp Sichuan peppercorns
2 tbsp Rosemary
2 tbsp celery seeds
1/2 an onion chopped thickly
As you can see there are no massive changes, the mustard was substituted due to me not being able to find the American mustard. The salt, pepper and Paprika were substituted in some part due to personal taste as I love variety in my seasonings and also to encourage some smokiness and the chopped onion which I added just for the overnight marinade was because I forgot to get onion powder. The major change for me was swapping the brown sugar for molasses. Molasses are more expensive but the taste difference is incredible as well as creating a sticky BBQ sauce … Yum.
How to cook:
The night before you want to cook your pork mix all your dry ingredients into a bowl before rinsing the shoulder in cold water and removing the skin and trimming the fat down to a 1cm layer. Rub the mustard into your pork, massaging it in to every bit of the meat and leave to sit for 30 minutes. After the 30 mins has elapsed rub your dry mix into the meat. You may find there is too much mix for your meat depending on the size of the shoulder. I used it all! Wrap your meat in clingfilm or sit in a bowl and cover in clingfilm which is what I did and place in fridge.

The next day remove your meat from the fridge several hours before you want to cook it and allow to get to room temperature. Place in roasting tin and cook at 120C/gas mark 1/2 for 6 hours before double wrapping in foil and cooking for further two hours. Do not be tempted to check on your meat just leave until the time is up. After the 8 hours remove from oven and leave to sit in foil for 30 minutes as I think this will make it even more tender. Whilst you do this return your roasting tray to oven to warm up the sticky sauce at the bottom.
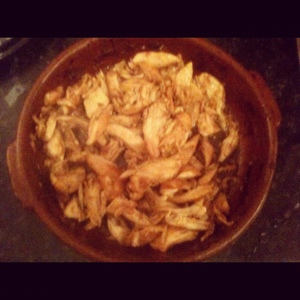
Open your foil return meat to the tray and tear apart with two forks stirring into the sticky sauce as you do. Serve immediately or cover in foil to keep warm.

I served mine in tortilla wraps with fresh green leafy salad and coleslaw and a teeny amount of Gefen BBQ sauce. There was no need for sauce really as it was very moisty and tasty. It was equally good the next day in rolls and even 2 days later when we gave some to Izzys grandparents to take home.

Definitely worth trying and thanks so much to Lewis @babberblog for sharing the recipe with me.
Let me know if you try this 🙂
Last year sometime I saw a version of this recipe on Pinterest and it looked good but I forgot all about it until a few months ago when I was struggling for ideas on what to cook for supper with very few ingredients at home. I vaguely remembered seeing this but couldn’t remember the quantities etc so I just threw it all together with the addition of an extra ingredient and WOW.
I don’t know who originally gave me the idea on pinterest but thanks 🙂
So here you go a very simple supper:
Garlic sugared chicken
You will need:
3 chicken breasts
5 tablespoons of brown sugar
5 tablespoons of olive oil
4 garlic cloves crushed or diced
1/2 teaspoon of dried chilli flakes
Preheat your oven at gas mark 4.
Warm olive oil in a cazuela or ovenproof pan in your hob before adding your garlic and chilli until softened and then add your chicken for just long enough to brown. Once your chicken is browned stir in the brown sugar until coated and then place in oven for around 15 minutes before stirring again to ensure your chicken is well covered in the garlicky, sugary goodness. Place back in oven for 10 mins then shred the chicken whilst still in the pan, stir through again and cook for a further 5 minutes.
Serve with a large salad and Nigella Lawsons Tuscan chips. ( recipe below)
This chicken is deliciously sweet and goey with a kick of chilli.
Ahh Tuscan chips. Nigella is so clever, creating beautiful chips with minimal effort. Here is the recipe Tuscan chips

Next up on the blog is BBQ pulled pork 🙂
Someone recently asked me when my love for the kitchen began. It made me think back on a million different cooking/baking memories and my very first ones all involve a certain recipe book:

Myself and my mum would use this book at least once a week to make treats for the rest of the family and I loved it. I tried to get her to part with the book when I moved out but it wasn’t going to happen .. I didn’t think for one minute that the book was still being printed until I spotted one on a random shopping trip a few months ago. I was so excited! I think this book definitely helped to develop a love for baking.
I mentioned this on twitter and on the Britmums forum and it seems a lot of us grew up with Be-Ro and it was interesting to read peoples memories of the book and also the favourite recipes of the people who like me are now using it on a regular basis:
Heather on twitter uses it most weeks to make scones or for basic recipes such as cheese sauce.
Mummy Zen a Britmums member has fond memories of cooking with her mum with her personal fave being the Australian crunchie!
Lisa Burns also from Britmums (40s chic) remembers a battered, torn Be ro book and cooking from it each week with her mum. Like me she recently bought an updated version and uses it a lot.
Since I rediscovered my book I have made:
Quiche Lorraine – a really easy to follow recipe for a beautiful quiche.

It didn’t last long in our house!
Cheese straws – beautiful cheesy flakey pastry. I made these for Izzys 1st birthday party and they went down so well that I have no pics. Sorry!
Victoria sandwich and milk chocolate icing – I used the basic recipes for these items in the book before adapting to make a layered chocolate orange cake for a local MacMillan coffee morning. It was delicious.

There are four layers of cake so it was pretty huge!
I’ve also made rich biscuits and chocolate eclairs amongst other things and am looking forward to working my way through the book.
Next on my list is the Australian Crunchie as its one of the only things I don’t remember trying when I was younger. I’ll let you know how it goes.
I’m excited to teach Izzy how to cook using this book as she gets older and who knows maybe she will pass it onto her children. 🙂
What are your memories of this book? Any special recommendations?
I’d love to hear from you xxx