Munchies and Munchkins

Food and travel

  • Home
  • Blog
  • About
    • About me
    • Privacy Policy
    • Terms & Conditions
    • Work With Me
    • Disclosure
  • Contact
  • Partners
You are here: Home / Archives for munchiesandmunchkins

Dark Chocolate Chip Flapjacks

July 16, 2016 · by munchiesandmunchkins · 6 Comments

Over the last few months I have been going through my older recipes on the blog, trying them out and making some amendments where needed. You will start to see some of the more popular recipes revisited and revamped a little with some hopefully more appealing photos. I first posted this recipe for flapjacks back in 2013,  at the time I didn’t really consider about readers actually making my recipes – it was almost like an online recipe binder just for me. Since then my readership has grown – thank you for that – and I wanted to make sure all of my recipes worked, tasted good and looked a little better! The first new ( old ) recipe is for these Dark Chocolate Chip Flapjacks.

I used to really like the flapjacks  made by the dinner ladies at my secondary school and I tried and failed to recreate them many times. Chewy gooey with just the right amount of buttery syrup.  This is the closest I have found, with a slightly more mature taste due to the slightly bitter dark chocolate. It really is the simplest recipe with minimal preparation.

Dark Chocolate Chip Flapjacks

You will need:

350g of rolled oats
200g butter
200g golden caster sugar
5 tbsp of golden syrup
100g 70% cocoa dark chocolate chips

Preheat your oven to 180c. Line a tray bake tin with greaseproof paper.

Melt your butter, sugar and syrup in a pan on your hob over a low heat until melted and then stir in your oats until thoroughly combined. Empty into a mixing bowl, cool and then stir through your chocolate chips. Spoon into your tray using the back of spoon to level the mixture out.Bake for 20 mins then leave to cool slightly in the tray before removing, you should cut into squares while still warm but not hot.

chocolate chip flapjacks

Now just try to stop yourself eating them one by one. Keep in an airtight container – they will keep for about a week.

Linking up to the We Should Cocoa challenge as hosted by Tin and Thyme.


Share this:

  • Facebook
  • X

Like this:

Like Loading...

Filed Under: Cakes, bread and all things baking, Recipes · Tagged: butter, flapjack, golden syrup, gooey, granulated sugar, porridge oats

11 Camping Essentials

July 11, 2016 · by munchiesandmunchkins · 1 Comment

If the weather decides to play ball I would like to make this a summer of camping, I have only managed one trip so far with a large group of family but Camp Bestival is coming up soon and I’d love to make some plans to camp with friends too.

After you have been camping a few times you start to create a mental list of the things you NEED and then the things that you want ..if you have room in the car!

1. Starting with The Tent:

Well it would be a bit problematic if you forgot the tent yes? We have been trying out two tents – one is a traditional technical tent from Olpro and the other a Vango Inflatable tent. You can find the review for the Olpro tent here and the inflatable tent review will be live in a few weeks. When considering a tent I say look at the size of not just the bedrooms but also the living areas as British weather is ..well not great. You need a good space that you can sit in with a book or to play a game or enjoy your supper – DON’T be tempted to cook inside your tent though.

martley 2.0 review

2. Airbeds:

Once considered a luxury I definitely view this as an essential and would never camp without one or a camped. They add an element of comfort and if placed over a blanket or underlay they stop the cold ground from seeping into your bones during the night!

3. Bedding:

All of the bedding. Woah it can get cold in the UK even on summer nights. Last year at Camp Bestival I was frozen. Any extra bedding we took was used on the girls as they shivered away and I pulled my youngest into bed with me just to try to absorb her heat. Never again – take more than you need. Thin layers of bedding are useful for the mornings when it inevitably turns into an oven and a fleecy or heavy blanket to pop over the top is great – a warm blanket is also nice to wrap around your shoulders as you enjoy some wine outside your tent at night.

4. BBQ/Cooking Stove:

You can’t quite beat the feeling of eating outdoors, birds tweeting, bees buzzing around and everything just tastes better.

5. Food & Drink:

I am still a bit of a foodie even when camping. I see no reason why you can’t cook a good meal around a campfire or stove. I love to make frittatas, pasta dishes or some pre made gnocchi when camping. Filling meals. I always take a loaf of bread and peanut butter for easy lunches for the girls and frozen bacon or sausages to last us a few days. On that note.. tinfoil is your friend – less washing up means much more to enjoy the trip.

Marinated chicken thighs are also a fave here, good for the first night of camping when you can marinate at home and keep cool until the evening:

bbq chicken thighs

6.Wet Wipes & Anti Bac:

Sticky hands, tent spillages or just the general messiness of camping. Muddy feet. Anti Bac gel for when you haven’t got the energy for the 30th trip of the day to the toilets to wash your childrens hands. Also great for using after going into festival toilets which even at the best of festivals can be a little grim.

7.Torch, lamp, candles:

For obvious reasons, it can seem blacker than blacker when you are in the middle of a field unless it’s particularly clear and starry. So used to street lights and being able to pop a light on whenever you want you need a ready supply of the above. Handy for midnight bathroom trips or if you are convinced you hear a large animal nearby.. or is that just me?? It is nearly always the person in the next tent snoring.

8. First Aid Kit, Insect Repellent:

Cuts and scrapes are a given with children and all of the midges in the world came out on our last trip. They seem to love me in particular.

9. A back up power charger:

Whilst lots of campsites now have electric hook up pitches, festivals generally do not. I always take a back up charger such as this Juice Weekender. I am a bit of a social media addict and I really don’t like to be non contactable

10.  Some kind of board game or cards:

Just for fun and to pass the time.

11. Books:

I wake up really early when camping, as soon as the morning light starts to stream through so I always have a book on hand for that early morning laze in bed.

Can you think of any other camping essentials??

  • The products mentioned in this post were gifted for the purpose of a review.

Share this:

  • Facebook
  • X

Like this:

Like Loading...

Filed Under: Festivals and Camping · Tagged: camping essentials

Picnic Time With Higgidy & Bananatella Muffin Recipe

July 7, 2016 · by munchiesandmunchkins · 8 Comments

I love to eat outdoors, this you will already know, especially if you have read my recent posts about Al Fresco dining and I really enjoy a nice picnic. The British weather doesn’t play along too often and planning one only to be let down by a surprise rain shower is a bit disappointing..even more so when you have small sad faces looking up at you. We have indoor picnics quite a lot, normally on a day where it’s just me and the girls after Izzy finishes school. We spread a picnic blanket across the floor and just eat sandwiches, fruits and treats spread out on small dishes in front of us.. we then have them in our garden when the sun decides to shine on us or in the conservatory on slightly gloomier days. Impromptu. Spontaneous. Guaranteed to bring a smile to their faces.

When Higgidy got in touch recently and asked if I would like to try their new quiche on one of our picnics – I said yes of course! The quiche we tried out was the new ham hock and petit pois flavour… and it was delicious. It has a seeded shortcrust pastry with slow cooked ham hock in a free range egg custard, topped with a turmeric and mustard crumb. This is not your typical cheese and ham quiche. I love the pea and ham combo in general – I think it stems from my childhood when my mum would make huge pans of pea & ham soup. The quiche can be eaten hot or cold although I have a preference for it hot but it is perfectly good when cold too and super handy to have in the fridge to grab and go. On that note we also tried the Veggie Feta & Red Pepper rolls which come in packs of six and are just the right size for a grazing style picnic. They contain crushed chickpeas, red peppers, feta and chia seeds encased in puff pastry and a crunchy tomato crumb – they have a really interesting and appealing contrast of textures and flavours.

Higgidy currently have an on pack promotion where you can enter a code from the inside of the packaging on their website for a chance to win a selection of Joules picnic goodies. I really like Joules products from their summer dresses to their funky wellies and they have some seriously stylish outdoor dining gear including the sea shell bowl below. Although we often just throw some bits in a cool bag and head off but I do like a proper picnic at times with the basket, various bits of crockery and maybe even a jug of Pimms? A flask of tea at the very least.

higgidy picnic quiche

higgidy quiche ham hock petit pois

picnic higgidy competition

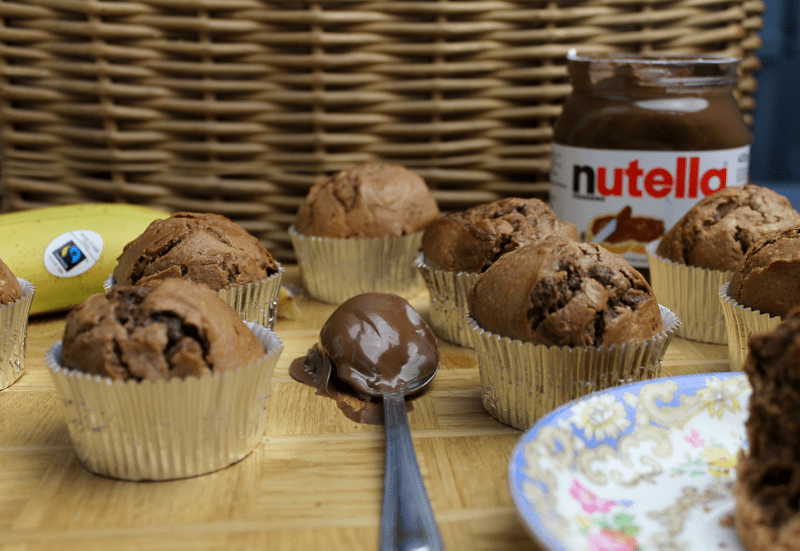
But it would be wrong to have a picnic with just savoury snacks right?? I had a large bowl of bananas that needed to be used up and rather than make my usual banana bread I came up with these Bananatella Muffins.. yes Bananatella.. a truly delicious combo of Nutella with bananas. Not just good for picnics, these work perfectly as an on the go breakfast and can be frozen too. The recipe below makes 18 very generously sized muffins.

Bananatella Muffins:

400g Self Raising Flour

100g Golden Caster Sugar

2 large eggs ( beaten )

3 over ripe bananas

200ml semi skimmed milk

250g Nutella

30ml Rapeseed oil

pinch of salt

Preheat oven to 180c. Combine your flour and salt together in one bowl and set aside.  In a separate bowl, mash your banana well and then add your sugar, eggs, Nutella and oil and beat until smooth before adding your milk. Now add your wet mixture to your dry mixture and combine but don’t overbeat. Spoon into muffin cases and bake for approximately 18-20 minutes. They should bounce back when pressed lightly on top.

These muffins remain moist for a little longer than typical muffins due to the banana and oil combination. If you can keep them for longer than a day or so that is. I know they do not last very long here.

bananatella muffins

*This post is in collaboration with Higgidy and I have been compensated for my time.

Share this:

  • Facebook
  • X

Like this:

Like Loading...

Filed Under: Recipe Development · Tagged: banana and nutella muffins

Easy Pancetta & Pea Pasta With Bertolli & Gennaro Contaldo

July 5, 2016 · by munchiesandmunchkins · 3 Comments

I have a bit of a pasta obsession. In my childhood we didn’t have it very much – I think pasta was still considered quite an exotic food in the UK in the 80’s to early 90’s. I remember when I first started eating it, it was probably in my early teens. My mum would make dishes like lasagne or spaghetti bolognese and I fell in love. It was also when I first started experimenting with making my dishes ( aside from sweet bakes ), I would often cook pasta with cheese sauce and broccoli or chicken for myself and my Dad whenever it was just us at home –  he has over the years become a pasta fiend himself.

It was the first time I sensed the incredible enjoyment of cooking for someone you love and making them happy through food – I can still taste that dish if I think about it. Anyway enough of my reminiscing. Bertolli recently got in touch and asked if I would like to recreate one of the recipes they have developed with Gennaro Contaldo. I use Bertolli oils and spreads quite regularly ( you can find a recipe for olive oil ice cream here using their fruity oil ) and I am a fan of Gennaro – I think it is the twinkly, friendly face and his way of chatting as he cooks. I chose this Pancetta Pasta with Peas mainly because I like the simplicity of the dish. Too often we can over complicate recipes with a hundred and one ingredients. This recipe has just 6 ingredients, pasta, peas, pancetta, mint, onion and Bertolli With Butter.

Bertolli gennaro pasta

Just 5 minutes prep and 15 minutes cooking time means there really is no excuse not to try this dish which is just full of fresh Summer flavour. I opted to make my own cheats version of garlic bread to accompany the meal and you can find the recipe for that below.

bertolli 3
Bertolli with butter is made from the quality olive oil that Bertolli is known for with a rich, buttery taste. Seriously so good.

For once I tried not to fiddle too much with someone else’s recipe and aside from adding some chopped garlic along with the onions I made no other changes. It is filling yet not too heavy and the mint is subtle but it’s still there in every mouthful. It easily serves 4, I have a small bowl for my lunch at work tomorrow too.

Gennaro has created 11 dishes for Bertolli and it’s not just pasta on the menu. There are a range of dishes from simple sides such as leek with bacon to the more intriguing strawberry risotto. You can find all of the recipes here.

Easy Parmesan Garlic Bread

Here in the UK we are never content with one carb laden meal, we have to just throw something else in as well don’t we? Garlic bread seems to be the favoured side for most of us with pasta dishes. This is a really simple one to make as it uses a store bought french stick simply sliced deeply, filled with Bertolli Butter and Garlic puree and sprinkled with parmesan.

You will need:

1 small french stick/baguette

150g Bertolli with butter

2 tbsp garlic puree/paste

2 tbsp grated parmesan

Preheat your oven to 200c. Mix your butter and garlic well. Cut diagonally into the baguette leaving a good inch at the bottom to hold it all together. Evenly distribute the garlic butter between the slices, wrap in foil and bake for about 10 minutes. Remove from the foil, sprinkle over your parmesan and bake for a further 3-5 minutes. Serve alongside your pasta.

bertolli 4

What is your favourite pasta dish?

* This post is in collaboration with Bertolli and I have been compensated for my time

Share this:

  • Facebook
  • X

Like this:

Like Loading...

Filed Under: Recipe Development · Tagged: bertollu

Eating Al Fresco – July Linky & June 2016 Round Up

July 3, 2016 · by munchiesandmunchkins · 10 Comments

Last month was the first month of my Eating Al Fresco Linky which will be running throughout the Summer months on this blog. I was a little nervous having never organised my own linky before ( I have guest hosted for others ) and I was ever so slightly worried that nobody else would join in, but I was wrong. Thank you to the 17 other bloggers who linked up to Eating Al Fresco for making the first month a success. A little further along in the post you will find links and images of their recipes as well as finding out who won the first Homesense gift card. Anyone who wants to join in with this months linky will find the details at the end of the post – it’s simple, just write about any of your outdoor dining experiences, link back to this one and you will be included in a full round up at the end of the month as well as have a chance to win a Homesense gift card each month ( chosen via random.org ).

So what have my outdoor dining experiences been like this month? Limited unfortunately as the Welsh weather hasn’t allowed for much Al Fresco fun but when we have the odd glimpses of sunshine I have made sure we have been out in the garden. On a few occasions I have enjoyed my evening meal after work while the girls eat their bedtime cereal on the grass besides me. My meals haven’t necessarily been cooked out there but they still taste better outside right?

The only exception has been this pork belly cooked on a small BBQ we picked up in one of the clearance sales last Summer. Just rubbed with oil, salt and pepper and chargrilled just enough so it was crispy yet succulent. Such a depth of flavour that I didn’t eat anything else alongside it just a brioche roll. Simple food. Cooked properly.

pork belly on bbq, eating al fresco

And my Greek Basil plants are seriously flourishing so I have been adding it to all my salads and pasta dishes:

greek basil plants uk

I did intend to buy a Firepit from Homesense this month but my local store sold out before I had the chance – you have to remember in Homesense to buy as soon as you see something you love as they aren’t there for long but it means lots of the items are pretty unique. I have bought lots of their melamine serving dishes though which I will share in my next post.

Without further ado here are the recipes which have been linked up to this months Eating Al Fresco:

Kicking off with Dutch Oven Roast Chicken from The Hedgecombers:

Dutch-Oven-Roast-Chicken-7030

Ice Cream Topped Waffles From Coffee & Vanilla

ice-cream-topped-waffles-750x500

Baked & Barbecued Thai Chicken Thighs from Fab Food 4 All:

Baked-and-Barbecued-Thai-Inspired-Chicken-Thighs-IMG_4822-lr2

Asparagus Pesto Tarts from Tin & Thyme:

Asparagus-Tarts-2-1

Best Ever Chunky BBQ Relish from Fab Food 4 All:

Best-Ever-Chunky-BBQ-Relish-PowerofFrozen-IMG_4718-lr2

BBQ Waffle S’mores from Foodie Quine:

waffle s'mores

Vegan Picnic Pies from Thinly Spread:

Vegan-Picnic-Lunch

Mediterranean Roasted Vegetable Pasties from Jo’s Kitchen:

pasties

Three Bean Salad With Asparagus & Coconut Dressing from The Taste Space:

three bean salad

Our Family Favourite Potato Salad from Elizabeth’s Kitchen Diary:

Barbecue-Picnic-Table-1

Grilled Sweetcorn, Samphire & Avocado Salad from Roast Chicken & A Country Walk:

avocado-grilled-sweetcorn-and-samphire-salad

Tenderstem & Cucumber Soba Noodle Salad from The Veg Space:

soba noodle salad

Portobello Mushroom Puff Pastry Tarts from Maison Cupcake:

Portobello-Mushroom-Puff-Pastry-Tarts-4

Marmalade Marinated Chicken from Farmersgirl Kitchen:

Marmalade-Marinated-Chiciken-Breasts-with-coleslaw-and-potato-wedges-4016

Mojito Cupcakes from Caroline Makes…

mojito cupcakes

Strawberry Cream Cakes from Tin & Thyme:

Strawberry-Cream-Cakes

The winner of this months linky is Fab Food 4 All with her Baked BBQ thighs as chosen by Random.Org:

random.org

If you want to enter this month please see the ( very loose ) guidelines below:

You can add up to three links each month as long as they either write about your outdoor dining experiences, feature a recipe for the BBQ or similar or simply show images of your food being eaten outdoors. You just need to add your link to the linky at the bottom of the page each month and link back to this post – simple yes? Now for the good part – each month one entrant will be randomly chosen via a number generator to win £30 in Homesense vouchers just for taking part. Tweet your entries to me ( @writingforfun ) using #eatingalfresco and I will retweet.

Share this:

  • Facebook
  • X

Like this:

Like Loading...

Filed Under: Eating Al Fresco · Tagged: eating al fresco linky, homesense uk, uk food linky

Adventures In Bavaria With BenQ

June 25, 2016 · by munchiesandmunchkins · 4 Comments

I recently had the pleasure of spending two days in Bavaria as a guest of BenQ to celebrate the launch of their new GS1 outdoor projector at the Knaus Tabbert campervan convention.

QImS4yJq.jpg-large-2

BenQ are a brand that I am already familiar with as I purchased one of their indoor projectors several years ago and I love it! Its great for having mock cinema showings or just to watch Game Of Thrones on the big screen..it creates atmosphere and more of a sense of occasion plus Jon Snow ( Game of Thrones ) on a larger screen is never a bad thing. When BenQ invited me it was a no brainer, I loved the sound of the product and I’d never been to Bavaria or anywhere else in Germany before so I was in.

It’s a funny thing travelling somewhere when you haven’t been responsible for booking the hotel or the transfers or even the flights. It was nice just for once to leave things in somebody else’s hands and I was a little spoilt. I escaped torrential rain in Bristol on a relatively smooth journey to Munich before spending a long but scenic journey to Bad Griesbach and the Hotel Maximilian, it would have been more scenic but I fell asleep a little on route!

flying

The hotel was impressive with a beautiful spa area and they made some killer cocktails too!

maximilian quellness spa

The relaxation room was lovely, as was the thermal steam room.

OP6IqiCY.jpg-large-2

I loved this tunnel which lead to the outdoor pool although it was pretty cold.

qanGTZKH.jpg-large-2

swimming pool cocktail

smoothie cocktail

Sorry for the poor quality images – just shot on my phone.

There were a mixed group of press including bloggers Karen from Mini Travellers, Briony from Anyway To Stay At Home, magazine journalists and editors including Mikkel from Connery.dk /Nordic Lad and Candy from The Camping & Caravanning Mag. The BenQ team made us feel incredibly welcome and it was a friendly fun group.

The enthusiasm that the BenQ team have for the brand and product is contagious and although I expected to like it from the get go I was more impressed than I thought I would be. Ideally suited for people who are campervanner’s (is that a word?), as it means they can watch TV on a larger screen – most camper van screens are about 24 inches, whilst the GSI can project 60 inches from a distance of just 1 metre. So you pop it on your dining table, fire it up in 3 seconds and relax on the bed or chairs watching a film or you could project it straight onto the back of your van. It’s also great for camping, project onto the side of your tent or use the pop up screen that you can purchase alongside it.

Here are some of the best points about the family friendly outdoor projector:


DROP PROOF

If children are running around playing games or an adult trips, even if it’s accidentally knocked onto the floor, the GS1with its case is Drop proof, which means it will even survive a fall of 60cm.

IPX1 SPLASH PROOF

Perhaps you’ve put the GS1 on the camping table ready for the movie to begin. What if a drink gets spilt? There’s no need to worry because GS1’s rubberised case is also IPX1 Splash Proof.

LOW HEAT

Unlike other projectors, the GS1 emits low heat making it safe enough for inquisitive children to touch without hurting their hands.
The family friendly GS1 is the only outdoor camping gear you need for entertaining. These design features give parents additional peace of mind so you can relax and enjoy time together.

What I thought:

Its tiny. Like actually tiny. Just about the size of my palm and yet it does everything the normal projectors do and more besides. Space in the car is always limited on a camping trip. I was also amazed at the quality of the image when used in ambient light – there are various settings for different scenarios. So far it appears to be as high quality as my current full size projector. It will be on sale for 599 euros from July 20th.

bA75VnrL.jpg-large

I won’t got into anymore detail as I will be reviewing the GSI fully over the coming months and I am sure I will have lots to tell you about it then but from what I have seen so far I think I am going to love it.

The GS1 was demonstrated at Knaus Dealer Convention in Bad Greisbach, Germany between 15-20th June 2016. Knaus Dealer Convention is one of the largest mobile camping conventions in Europe. The GS1 outdoor leisure projector is priced at 599 Euros including 20% VAT (MSRP). It will be on display at the show but will officially launch 20th July 2016.

Thanks to all at BenQ and Adrenalin Marketing for the invitation and hospitality.

Follow BenQ on social media for the latest info:

Twitter
Facebook

  • I was invited to Bavaria as a guest of BenQ.

Share this:

  • Facebook
  • X

Like this:

Like Loading...

Filed Under: Reviews · Tagged: benq camping projector, benq review, maximilan quellness

Riverford Organic Food Review

June 25, 2016 · by munchiesandmunchkins · 3 Comments

I’ve recently had the pleasure of trying out the Riverford fruit, veg and meat box as well as the newer recipe boxes.

rf-logo-new

The recipe boxes contain every ingredient, pre measured to create perfectly delicious and healthy meals at home – they are ideal for people who are looking to enhance their cooking skills or just people who have busy lifestyles. We reviewed the original 3 meal recipe box which is created to serve two people but the serving sizes are incredibly generous so you could easily share between a small family or have leftovers the following day.

The Recipe Box:

Pollock with spicy saffron potatoes:

I rarely cook fish or choose it at a restaurant as I am just not that into it. This pollock however was meaty and mild and enhanced by the lemon and butter – it was sensational. Served with spiced saffron potatoes, fennel and a garlic aioli, it was truly one of the nicest dishes I’ve cooked in a while.

pollock and saffron en94AygC.jpg-large

Honey & Sesame Chicken With Teriyaki Spring Noodles:

Packed full of flavour and zing from the ginger and chilli, this dish makes you feel good about yourself! Its the first time I have used Kohlrabi and it was a nice discovery. Served with Udon Noodles it was a filling meal and again easily served three with some leftovers.

Courgette & Tomato Gratin With Bay & Garlic Beans:

I made this gratin the night before I wanted to eat it as I knew I had a busy day at work the following day, like lasagne I believe the flavour was probably enhanced by leaving it overnight. I didn’t serve the recommended side dish due to time constraints but I am definitely going to try it sometime as it sounds delicious.

Overall thoughts:

Impressed. The meals were considered and nutritionally balanced. I particularly like the cook’s notes at the beginning of each recipe. Having never cooked pollock before it was useful to have tips on how to get the perfect crispy skin. I would certainly consider ordering these boxes in the future when I know I have a busy week ahead. It would also be a really useful gift for someone following a new baby arrival, full of the goodness you need and simple to follow. Oh and the labels even tell you where and when the fish was caught and the name of the person who caught it – pretty cool huh? The chilled goods are insulated with sheep’s wool which you return to the driver on your next delivery.

The Fruit, Veg & Meat Box:

The fruit and veg boxes are where Riverford began and they do it well. Lots of choices available for you to pick on the site from small boxes starting at £10.35 for 6 varieties including 4 seasonal options and 2 staple veggies leading gradually up to the large fruit, veg and meat boxes at £50.10. The medium fruit, veg and meat box I received contained 6 organic veggies ( not potatoes ), 3 fruit varieties and 3 cuts of organic meat cuts. I had bananas ( fair trade ), wet garlic, bunched carrots, courgettes, avocados, blueberries and apples as well as cooking spinach, tomatoes and green beans I can’t recall – sorry. The meat cuts were a pork joint, lamb steaks and diced beef. All meat is free range and all produce organic.

It was such a lovely box of goodies and kickstarted a healthy week of good food and snack choices. I hadn’t tried wet garlic before although I had heard lots of good things – its garlic picked a little earlier than typical garlic bulbs, it has a milder taste and the bulbs don’t require peeling as the skin is so soft.

Dz7QpcsO.jpg-large

Overall thoughts:

I am considering setting up a regular order for these fruit, veg and meat boxes. The quality of the produce and meat is exceptional, far superior to any of the local supermarkets and I enjoyed having items I may not have typically chosen.

To finish off I want to share a little info about Riverford as a brand:

The Riverford box scheme began when Guy Watson started delivering vegetables locally to 30 friends in Devon. They now deliver around 47,000 boxes a week to homes around the UK from our regional farm – how’s that for expansion?

  • I received these boxes for the purpose of a review.

Share this:

  • Facebook
  • X

Like this:

Like Loading...

Filed Under: Reviews · Tagged: riverford fruit, riverford recipe box review, veg and meat boxes

Portuguese Style Custard Tarts

June 14, 2016 · by munchiesandmunchkins · 5 Comments

We recently had a lot of egg yolks leftover from one of our ice cream making batches and you know me I hate waste so I got to work making a batch of creme patissiere – well my version of it anyway! This is a thickened custard which can be used in lots of different ways, to sandwich cakes together, in fruit tartlets or to squeeze into fresh doughnuts or eclairs. My current favourite way to use it is in these Portuguese style custard tarts. I have also be known to eat it by the spoon on more than one occasion!

portugese tarts

I’ve called these Portuguese style tarts as they aren’t exactly the same, most tarts for example use puff pastry and I had no time to make my own and I love making shortcrust as its so easy but feels like more of an accomplishment – I am easily pleased!

Portugese Style Custard Tarts

You will need:

For the pastry:

225g plain flour
100g butter cubed
40g caster sugar
3tbsp cold water

For the filling:

200ml double cream
50ml whole milk
3 large egg yolks
250g golden caster sugar
30g plain flour
20g butter
1tsp cinnamon
1.5 tsp pure vanilla extract

Whisk your yolks, sugar and flour together and set aside. Heat your cream, milk and cinnamon together in a pan until boiling, remove a small amount (approximately 75ml ) of the mixture and whisk into the yolk,flour and sugar mix, add some more and whisk again before pouring carefully into the cream and milk in the pan. Whisk together and cook over a low heat until thickened ( should not take more than a few minutes ) now whisk in your butter and vanilla. Pour into a bowl and leave to cool – pop a layer of clingfilm on top of the mixture so it is touching the top to avoid a skin forming.

Preheat your oven to 200c ( 180c fan ). Combine your flour and sugar then rub your butter into the mix until it resembles breadcrumbs, add your water little by little until you have a dough. Roll out your dough onto a well floured surface until approximately 1/4 inch thick and using a round cutter, cut 12 circles from it. Place into a tart baking tray and press to fit the hole. Spoon in your cooled custard mixture and bake for approximately 20 minutes until they look golden brown on top and the pastry is cooked.

portuguese tarts shortcrust pastry

creme patisserie baked tarts

Try really hard not to dive in before they cool a little! These are equally good the following day if you can leave them that long! These are utterly delectable.

Share this:

  • Facebook
  • X

Like this:

Like Loading...

Filed Under: Cakes, bread and all things baking, Recipes · Tagged: creme patissiere baked tarts, leftover creme patissiere, pastry cream, portuguese custard tarts

Olpro Martley 2.0 Technical Tent Review

June 13, 2016 · by munchiesandmunchkins · 4 Comments

We have camped quite a lot as a family over the years, at festivals and also at campsites with friends and extended family. Over the past 3 years we have cheated a little at festivals and glamped with the various boutique camping companies instead, mostly due to me being pregnant or having a newborn BUT we haven’t really noticed a big difference in our comfort levels than when we had our own normal tent. Now that our family is bigger and we fully intend to camp a lot more we knew we needed a larger and hardier tent so this Olpro review offer came at just the right time.

martley 2.0 review

The Martley 2.0 is considered a technical family tent – I am not a camping whizz so I will share a little bit of info from the manufacturer before telling you what we thought:

The important details:

190T polyester OLTech fabric
Easy to erect Tunnel Design
20-30 Minutes Pitching Time
5000mm Hydrostatic Head
10000mm HH Polyethlyene Groundsheet
Fully waterproof with taped seams
Fire Retardant Fabrics
Sewn in groundsheet
Pitch as one, take down as one
5 Fibreglass Poles
Ring and Pin system
Cable entry point on both sides
Black, grey and red design
Colour coded poles
Fly screens and ventilation
Drop down porch floor
Anti-trip toggle on both doors
Complete with canopy poles
Built in organisers – one on either side
Lantern hook
Draught skirt protection
Two Large Windows with Roll Down Curtains
Roll down curtains & full windows
Longer centre pole for extra height
Two Large Fully Breathable Inner Tents
10000mm HH Inner Tent bases

Firstly and rather importantly – the pitching time:

We fully expected this to take the 20+ minutes of time quoted and possibly more due to it being the first time we had used it so we were pleasantly surprised to get the tent up within 15- 18 mins maximum – this was also with two small children who delighted in trying to run into the tent before it was fully set up. The instructions were clear and it was really simple to follow using the colour coded poles. Once it was up, we were really impressed with the look and feel of the tent and even more impressed that it had managed to fit into one not too humongous bag. The separate bedrooms were easy to hook up and once the mosquito/fly screens were zipped up for the day I was satisfied that there wouldn’t be any creepy crawlies sneaking in for a visit. We left the main living area of the tent open for the most part to cool it down and for ease of access for the kids. The living area has loads of storage space with organisers hung up on either side which I found so helpful with keeping all the childrens bits and bobs such as suncream, wipes and snacks close at hand.

martley tent interior

There is a lantern hook in the top centre of the tent from which we hung a solar powered light during the evenings until the girls had settled to sleep. If you camp you will know that it can get surprisingly cold in the evenings and whilst we still had to layer up we found it was a lot warmer than in previous tents we have used. The bedrooms are spacious with each one having room for a double airbed and a little storage space for bags or two single beds and a hoard of soft toys and blankets. The quality of the fabric is strong and I am confident in its ability to keep out the rain – although thankfully we are yet to test that aspect! There are doors on either side as well as windows on opposite sides and inside the bedrooms, all with curtains which can be rolled down to keep it a little darker in the mornings. We camped with a group of my family members who were all impressed with the tent and also surprised by the size and that it fit into our teeny car boot along with all the other luggage you have to take when camping with small ones. There is a canopy with poles which can be put up to create a porch area. We didn’t feel the need to use this as the weather was so glorious but would perhaps be useful for sitting under with a cuppa on a drizzly day.

Another note on the living area is that it comfortably sat 6 children of varying ages during the evening with oodles of extra space. They sat in there each night from about 9pm to keep warm, watch a film on my kindle and chatter while we drank wine outside and got eaten alive by the midges.

martley 2.0 living area

Choc chip brioche is an entirely acceptable camping breakfast:

camping breakfast

martley 2.0 tent

I have noticed that in the photos it looks like there is a tear or line down the middle of the front window – this isn’t the case, just a fold from where it was packed.

IMG_7065

I asked Andrew what he was impressed with to get a male angle on it:

The height – he’s 6ft 2 so it was essential that there was room for him to stand up and move about easily.

The way the poles threaded into the tent – I hadn’t really thought about this until he mentioned it but if you look at the photo above you will see that the poles only go into a small section of the actual tent material. This means less chance of pulling at the seams and causing holes but also its MUCH easier to thread through without the poles breaking apart while you do it. That alone I find is one of the most annoying parts of putting up a tent. The Martley makes that part simple.

The sewn in groundsheet and draught excluder around the base of tent – I am assuming this made a big difference to the temperature of the tent at nighttime and also stopped any part of the tent getting soggy or grubby.

On a final note, how was it to pack away? Andrew and his Dad packed the tent away in about 15 minutes, fairly simply which is always surprising. Tents tend to fight returning to the bags but this was just fine.

Overall – very impressed and it has just made me want to go camping again and again this summer. Oh as you can see it looks stylish too and stands out amongst other similarly coloured green or blue tents.

You can buy the tent on the Olpro site along with any other camping gear you require.

Our first camping trip of the year was a resounding success. I can also recommend the camp site we stayed at in Dare Valley Country Park – its incredibly scenic and some wonderful walks. Spot Andrew and some family members atop of this hill:

dare valley country park

  • As stated at the top of the post I was gifted this tent from Olpro for the purpose of an honest and unbiased review.

Share this:

  • Facebook
  • X

Like this:

Like Loading...

Filed Under: Festivals and Camping, Reviews · Tagged: dare valley country park, olpro martley tent review, olpro tents, technical family tent

Mango & Lime Rum Punch & 13 Summer Cocktail Recipes

June 7, 2016 · by munchiesandmunchkins · 8 Comments

I love cocktails and if I have to pick a favourite it would be a Mojito. Something about the combo of rum, mint and lime combines to make THE best cocktail. This Mango and Lime Rum Punch may not be a Mojito but its still pretty awesome!

Along with the super simple recipe for my punch you can find below some amazing cocktails from fellow food bloggers, please sure to go check them out!

Mango & Lime Rum Punch

You will need:

150ml chilled mango pulp/puree

Juice of 1 lime

25ml sugar syrup

75ml dark rum

100ml chilled still lemonade

granulated sugar to rim your glasses/a little sugar syrup to decorate your glasses

Chill your pulp and lemonade first. Blend all of your ingredients together, I just stirred them well but you could blitz in a blender if you wish. Brush the rim of the glasses with a little sugar syrup and press into some sugar to make it look a little prettier – serve with a wedge of lime on the edge of the glass.

Best served on a sunny evening al fresco!

mango pulp Cocktail


Coconut Cocktail from Supper In The Suburbs

Shim-cocktails-are-the-next-big-thing-and-this-Tall-Coconut-Cocktail-comes-in-at-just-one-unit-find-the-recipe-at-Supper-in-the-Suburbs

Sloe Pink Gin Lady from Supergolden Bakes

Pink Lady Sloe gin cocktail

Gin, Strawberry & Cranberry Cocktail from Foodie Quine

blogger-image--352629840

Ginger Cooler from Lovely Appetite

gingercooler-webSunshine Cocktail from Rough Measures

SpringSunshine3

Gin & Basil Smash from The Crafty Larder

basilsmash - 1

Earl Grey & Gin Tonic from Emily’s Recipes & Reviews

Earl grey gin and tonic

Blackberry & Elderflower Julep from The Botanical Kitchen

11156126256_5ab7bd28ea_b

Caipirinha from The Hedge Combers

Cocktail-2064-2

Tropical Layered Summer Cocktail from Coriander Queen

Passionfruit-and-grenadine-cocktail-sharp

Spring Gin Lemonade from Sew White

Sew-White-spring-gin-lemonade-1

Strawberry Daiquiri from Coffee & Vanilla

spiced-trawberry-daiquiri-500x750


I hope this has whet your appetite ( so to speak ) – do let me know if you try any! I have a pineapple mojito coming up soon so look out for that!

Share this:

  • Facebook
  • X

Like this:

Like Loading...

Filed Under: Drinks · Tagged: mango cocktail, mango punch, summer cocktails

  • « Previous Page
  • 1
  • …
  • 33
  • 34
  • 35
  • 36
  • 37
  • …
  • 125
  • Next Page »
Food Advertising by logo

Connect with me

  • Email
  • Facebook
  • Instagram
  • Twitter

The Wonders Of Wales

*Gifted - restaurant review * It’s been a while since I’ve posted a restaurant review on here but I’ve been itching … Read More

The Wonders Of Wales

Recipe Development

Oreo Mint Choc Chip Ice Cream – Oreo Flavours

I love Oreos. Eaten whole, munched in half, deconstructed with the filling scooped off and of course dipped in tea. What … full post here

Read more like this...

Food Advertising by logo

Archives

Categories

Meta

  • Log in
  • Entries feed
  • Comments feed
  • WordPress.org
Food Advertising by logo

Copyright © 2025 | Powered by Munchkins

%d